Setting Up an Account
Go to the Go2Lister website and click "Start a Free 14 Day Trial Now"
Enter your full name, email address and desired password.
Enter your full name, email address and desired password.

Select your preferred subscription (Annually / Monthly).
Complete your contact information and enter your payment details (your payment method will not be charged until the Free Trial period expires).
Click "Start My Free Trial"
That's it! You now have access to Go2Lister's full suite of powerful features with a risk-free 14-day trial.
Complete your contact information and enter your payment details (your payment method will not be charged until the Free Trial period expires).
Click "Start My Free Trial"
That's it! You now have access to Go2Lister's full suite of powerful features with a risk-free 14-day trial.
Connect Go2Lister to Your Amazon Account
On the left side of the page, click "Profile" > "Connection" and then click the button "Connect to Amazon".
1. On the left column, click Connection under the Profile category.

2. Click Connect to Amazon.
3. You will now be redirected to Amazon Seller Central to complete the authorization process.
3. You will now be redirected to Amazon Seller Central to complete the authorization process.
Dashboard
Batches
Create
This option will allow you to create a "batch" where you will list your Amazon inventory. You can create FBA shipments here or list your items as Merchant-Fulfilled (MF). See "How To Create Your First Batch" for additional information.

History
The History menu will show you all in-progress and completed batches that were created in Go2Lister. If you start working on a batch and need to return to finish it later, this is where you can find it and resume work. The History menu is also helpful for reviewing completed batches.

Settings
Batch Settings allow you to create a default "shipping from" address, default item conditions, custom SKUs, and product sources. This is also where you can customize your pricing rules and indicators. Finally, you can choose whether you want to print labels automatically with a label printer or print 30-up labels using a standard inkjet/Laserjet printer. See Settings for a detailed breakdown of these settings.

Reports
Sales
You can track your daily sales and historical sales by simply checking the sales data and the displayed graph. You can view historical data by changing the timeframe in the Dropdown at the top right of the Sales report page. This report can be downloaded/exported for additional customization by clicking Download.

Orders
This report displays all orders and related information (like profit!) within a given timeframe. As with the Sales report, you can adjust the timeframe at the top right of the Orders report page. Furthermore, you can view All orders, FBA sales only, or MF sales only by selecting from the tabs at the top of the page. This report can be downloaded/exported for additional customization by clicking Download.

Profit
In this section, you can track your total sales and profit up in a given timeframe, up to the last 12 months. This report tracks your total sales, cost of goods (COGs), total fees, and total gross profit. This report can be downloaded/exported for additional customization by clicking Download.

Inventory
The Inventory report lists all current and inbound inventory. This report also tracks your total sales value, FBA sales value, MF sales value, and inbound sales value.

Profile
Account
Authorize Go2Lister to access your Amazon Seller Central account, or confirm Go2Lister is successfully connected to your Amazon Seller Central account.
Connection
This is where your billing details can be found and where to confirm your account status is active.
Create A Batch
From the dashboard, click Create in the left hand column.

Select Your Fulfillment Type
Fulfilled by Amazon (FBA)
is a service provided by Amazon that allows sellers to store their products in Amazon's fulfillment centers. Amazon then takes care of storage, packaging, shipping, and customer service for these products.
Merchant Fulfilled (MF)
also known as Fulfilled by Merchant (FBM), is a fulfillment option on Amazon where the seller is responsible for storing, packaging, and shipping their products directly to the customers. Unlike Fulfilled by Amazon (FBA), where Amazon handles these logistics, MF gives the seller full control over the entire fulfillment process.

Batch Name
The batch name can be anything you choose. You can add the invoice, source or date in your batch name for later reference.

Pricing Rule
Match Buy Box
Once you scan and enter your items, your listing price will automatically match the current buy box (also known as featured offer).

Smart Pricing
Is a dynamic pricing strategy that uses algorithms and data analysis to optimize prices in real-time. Parameters include market demand, competitor analysis, customer segmentation, inventory management, and external factors. It aims to maximize revenue by adjusting prices based on these factors. Please check this video to understand more about how it works.

Listed By
Put the name of the person who is currently listing the batch.

Shipping From (FBA Fulfillment Only)
Use the address where your items or shipment will be shipping from. If you've already set your address in Settings you can choose it from the dropdown. Otherwise, click the Add (+) button to enter a new address.

Who Labels (FBA Fulfillment Only)
I want to label my products (recommended)
We highly recommend selecting this option to reduce the fees of your shipment. This option allows you to print the FNSKU labels and stick them on the items you will send to Amazon.
I want to pay Amazon $0.30+ per item to label for me
This option allows you to have Amazon label your items when it arrives at their fulfillment center, but you will have to pay an additional fee for it. Unless you have no access to a printer, it is recommended that you label your own products to protect your profits. This fee adds up fast!


Packing Type
I am packing individual products
This option is for booksellers and other sellers that are selling individual items.
I am packing case packed products
-This option is recommended for wholesalers and sellers sending large quantities of a
single SKU.
-Case packed means that when sending 50 units of 1 SKU, they can be packed in cases (boxes), saving the seller on placement fees. For instance, you can have 50 items of 1 SKU, or 2 cases of 25 units each. When listing the latter example, you would indicate 2 boxes and fill in 25 units for each box. However, keep in mind that Amazon still has the ability to split them per case. For example, in the given scenario, you might receive a shipping plan of 25 units at destination CLT2 and 25 units at destination BER1, both packaged in separate cases. you might receive 25 units at destination CLT2 and 25 units at destination BER1, both packaged in separate cases.


Box Content
I want to use Go2Lister to provide box content
The Box Content feature in Go2Lister allows you to complete the entire packing and shipping process within the Go2Lister ecosystem. The process is much more simplified and automated than it appears in Seller Central, resulting in fewer shipment problems. Using this feature, you will have to scan or enter your items per box to ensure you are packing the items according to Amazon's shipping plan.. Additionally. If you choose this option, you will have the ability to print FBA and shipping labels on the Go2Lister website.
I want to use Seller Central to provide box content
If you select this option, you will have to finish the shipment in Seller Central to print an FBA and shipping label. Additionally, you may be charged additional fees for not providing the box content.


Scan Your Items
Using a barcode scanner, simply scan the barcode of your items with your cursor in the search box. If a barcode scanner is unavailable, feel free to enter the ISBN, UPC, ASIN or the keywords of your items in the search box.

Note: Be sure your cursor is blinking in the search box before scanning.
Condition
Choose the appropriate condition for your inventory. Clicking the More button will give you Collectible condition options, which can be used for collectible items (rare books, games, etc.). Be sure to review Amazon's Condition Guidelines for your item category to understand how to accurately grade your items.
Quantity
Enter the exact number of the items you are going to list.
Number of Cases (Case-Packed Only)
This option will only be displayed if you select the option "I am packing case-packed products".

Note: the number in Quantity must be divisible by the number in Number of Cases to prevent encountering the error below.

Source
Enter where the items were sourced from (e.g Goodwill, Walmart.com, etc.).
Buy Cost
Enter your total cost for the item. This is important to calculate your estimated profits (Listing price - buy cost - Amazon fees = estimated profit)
Condition Description
Condition notes are helpful for giving potential customers more information about your item, particularly if it is in used condition. Go2Lister allows you to store condition notes that will be frequently used. Type your description in the text field and click the "Add…" dropdown box to store the note. These can be deleted later in Settings.

Listed by
Put the name of the person who is currently listing the batch. These can be stored for quick selection, and stored names can be removed in Settings.

Auto Print
Enable this toggle button if you want the FNSKU label to automatically print while you scan the items you're going to list. If using the Box Contents feature, you will have the option to auto print your FNSKU labels while packing, which keeps your barcode available for scanning at that step. This option should only be used if you are printing individual labels with a thermal printer.

Note: If you are using Go2Lister's Box Contents feature, you may find it more productive to your workflow to print your FNSKU labels as you scan them in that section.
Print Error Labels
Using this setting, an error label will be printed in place of an FNSKU label when listing to avoid mislabelling.

Allow Restricted Items
If this setting is enabled, restricted items will still be added to your batch. However, you can't submit the batch since there are restricted items.

Use Unique SKUs
This setting will assign a unique SKU to all items scanned, rather than assigning the same SKU to multiple quantities of one item.

Use Manual SKUs
The lister can manually type the desired SKU they want to use. For maximum efficiency, it is recommended to configure your SKU template in Settings. However, this setting is useful if you want to exclude an item from repricing, for example.

Auto Replenishments
This setting will replenish inventory on an existing SKU from your batch history.

Accept Shipments
Once you are finished adding items to your current batch, click Send Batch at the top right of the page. Your inventory will be submitted to Amazon Seller Central to create a shipping plan.

A proposed shipping plan will be shown, detailing any split shipments and displaying the quantity of items to be sent to each warehouse. You can choose to accept this shipment plan or cancel and return to the inventory screen.
Box Content Page
Scan your items and they will automatically be assigned to their designated box. If there are split shipments, Go2Lister will indicate which box the item can be packed in.
If there is no split or all the items can fit in one box, there is an option to "Add All to One Box." If you've already labeled your items, the items can be packed and prepped for shipment. When all items are packed in their designated box, confirm no box exceeds 50 pounds, and click the button "Send Box Content".
For a step-by-step tutorial of how to use the Box Contents feature, check out this video!
Edit Shipment
Once you've accepted a shipment plan, you can only adjust the quantity of each item by:
- Up to 5% of the original amount or
- 6 units, whichever is higher
So, if you have 100 of a particular SKU in your shipment, you can increase or decrease that number by up to 5 units (5%). If you have a smaller quantity, like 20 units, then the maximum change allowed is 6 units.Keep in mind that you cannot add new SKUs to an existing shipment plan.While adding your inventory to a batch, you can add/remove inventory at any time. Once a shipment has been selected, you can only remove inventory as detailed above.To edit your shipment, click the Edit Shipment button in the Box Contents section.

In the popup screen, you can edit the quantity of your items, down to zero if necessary.

When you've made the necessary changes, click Submit to continue the Box Contents workflow.
Box Sizes
Enter the correct weight and dimensions of the boxes. Confirm that no box exceeds 50 pounds per Amazon's FBA shipping guidelines.
Click the "Submit" button when all dimensions have been correctly entered. You can go back to the previous step if you need to make edits.

Printing FBA Labels
The final step in listing your items is purchasing shipping to the designated warehouse(s).
Go2Lister will submit your box contents information to Amazon and provide you with a shipping quote.
Click the button Accept Charges to generate your FBA and shipping labels. Note: these charges will be debited from your Amazon Seller Central account or payment method. Go2Lister does not charge you directly.
If your labels do not pop up automatically, click Reprint Labels and your labels will be downloaded to your browser's download folder.
Address
Users can add and update their default address here when creating a new batch. This will be important for generating accurate shipping quotes when sending shipments to Amazon.

Enter the address you will be shipping items from. This can be your home address, even if you are dropping off to a carrier.
You can choose a default Shipping From address to avoid having to select a Shipping From address upon creating a new batch.

Item Conditions
Users can update their default condition here when listing items. Choose whatever condition you anticipate using the most. Don't worry, this can be changed on a per-item basis while listing!
You can add default condition notes here that you plan to use frequently. These can also be added or customized while listing. Saved condition notes can be deleted by clicking the trash can icon on the right.

SKUs
Users can set their custom SKU on this page by simply enabling the Custom SKU option and selecting the desired tags to be added to the SKU. You can use any combination of the options given. You may find it useful to include List Price, Sales Rank, and List Date for tracking performance in the future. Be sure to include Item Count or Random Number to ensure your SKUs are always unique.

Sources and Listers
On this page, the user can add the default sources (where you acquired your items) and any listers who will be listing inventory. These are useful for tracking performance and tracking down any lister-specific issues in the future.

Pricing Rules
The Pricing Rules gives you the option to set Min/Max price rules, select your default Auto Pricing Rules (Smart Pricing, Match Buy Box), and gives users a peek into the rules that govern the Smart Pricing feature.
You can choose your default pricing rule between Smart Pricing and Match Buy Box. Generally, new sellers who do not have Buy Box/Featured Offer eligibility will see better sales using the Match Buy Box option. Smart Pricing is a powerful tool for maximizing profit by targeting higher prices based on sales velocity.
The Min/Max Price Rules are useful to keep repricing software from selling at a loss or triggering a high pricing error (which deactivates your listing). You can choose None, Percent Rule, or Dollar Rule.

Indicators
Indicators are rules you set to give you an "at-a-glance" view of your item's sales velocity and estimated profit. When listing, you will see green or red dots next to your item's sales rank and estimated profit. The idea is when you see a red dot, you should take a second look and consider if this item will be worth listing. Both the sales rank and profit indicators can be customized here to suit your business.

Printer Settings
Printer Settings allows you to set your default printer and label sizes. Go2Lister supports Rollo and Dymo thermal printers as well as manual printing of 30-up labels (using a laser/inkjet printer). See Printer FAQ for more details on connecting your printer with Go2Lister.

Box Content
Scan / Enter your items
Using Go2Lister's revolutionary Box Contents feature is quite similar to the process you learned when scanning your inventory into a batch. On the right side of the screen, you will find that Go2Lister has created boxes for each of the shipments in your shipment plan, labeled with the warehouse it is destined for. You should prepare enough boxes and label them with the warehouse code to pack your items as you scan/enter them into the Box Contents section.

Add All to One Box
If your entire shipment will fit into one box, you can save time by clicking the Add All to Box 1 button. This will automatically sort your entire shipment into one box so you can skip scanning each item individually. Don't forget to print and apply your FNSKU labels if you haven't already!

Add Box
If your box exceeds the weight limit before your inventory is completely packed, you'll need to add a box. Click Add Box and a new box will be created for you. You can move inventory to the new box if necessary by clicking Move in your list of inventory.
Remember: Amazon guidelines state that a box can weigh a maximum of 50 lbs. Be sure to keep an eye on the Estimated Weight as you scan, and confirm this weight with an accurate scale before shipping.
Edit Shipment
Once you've accepted a shipment plan, you can only adjust the quantity of each item by:
Up to 5% of the original amount or
6 units, whichever is higher
Example: If you have 100 of a particular SKU in your shipment, you can increase or decrease that number by up to 5 units (5%). If you have a smaller quantity, like 20 units, then the maximum change allowed is 6 units.Keep in mind that you cannot add new SKUs to an existing shipment plan.While adding your inventory to a batch, you can add/remove inventory at any time. Once a shipment plan has been accepted, you can only remove inventory as detailed above.To edit your shipment, click the Edit Shipment button in the Box Contents section.

In the popup screen, you can edit the quantity of your items, down to zero if necessary.
When you've made the necessary changes, click Submit to continue the Box Contents workflow.
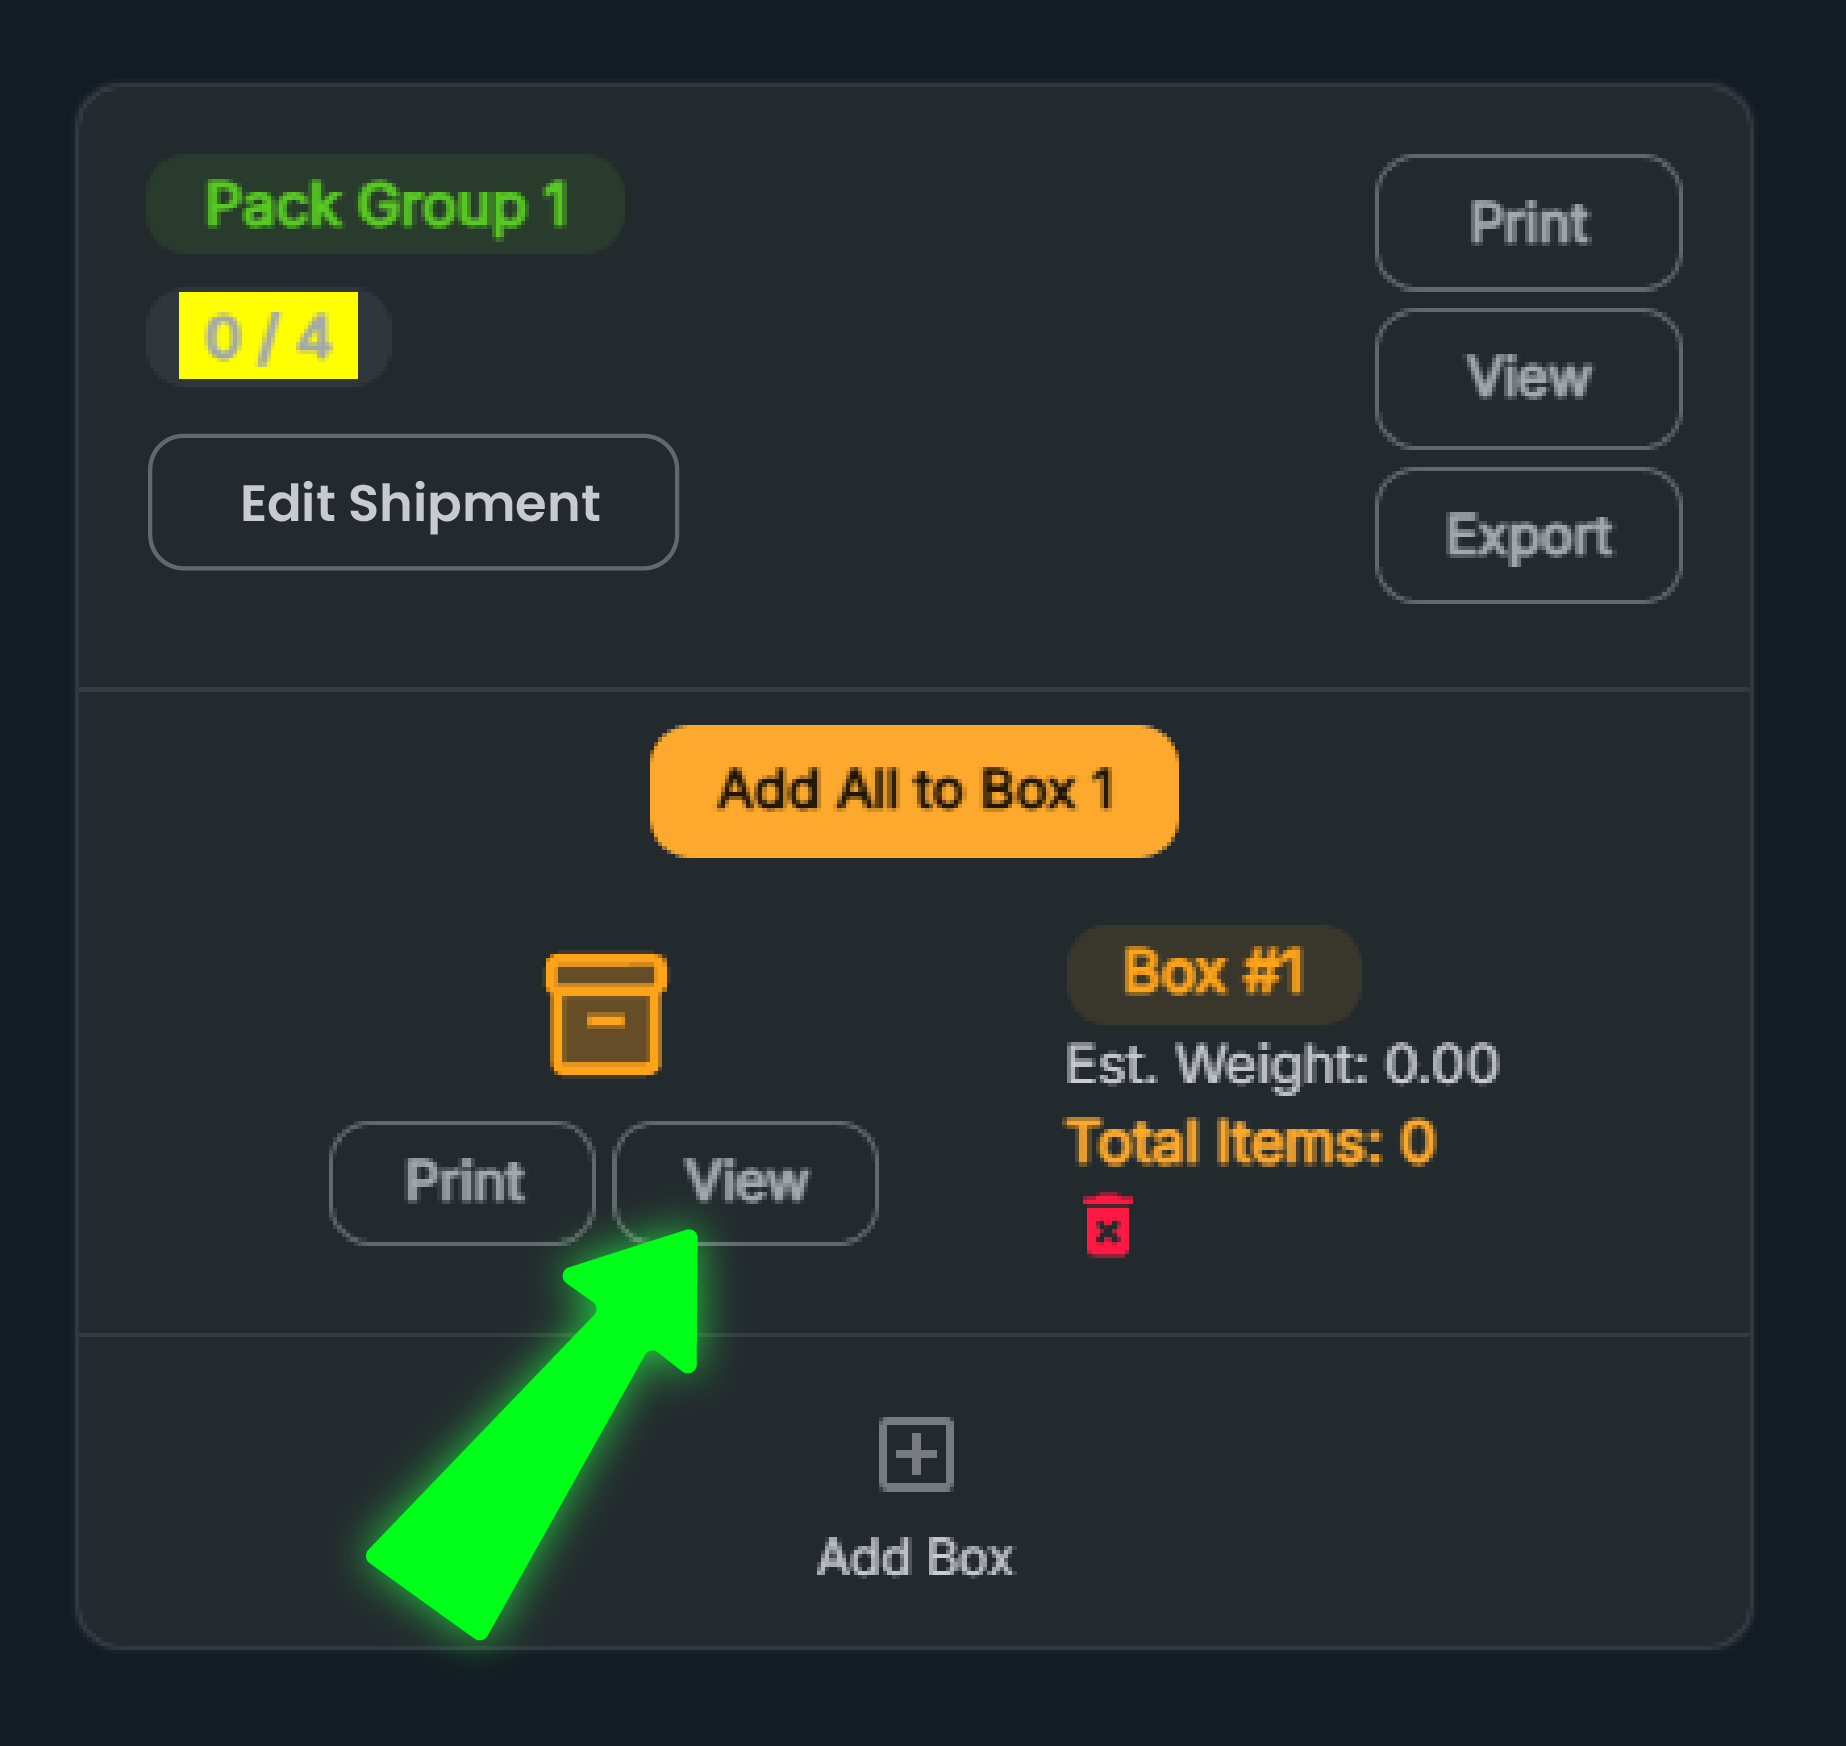
View
The View buttons are a handy tool in the Box Contents section that allow you to view the total inventory in a shipment, as well as the contents already assigned to a box. To view the total items in a shipment, click the View button at the top of the right pane.

A page will appear listing the inventory included in this shipment. Items not yet assigned a box will be highlighted in yellow. You can copy your FNSKU here and paste it into the Box Contents section to add it to a box if, for example, the item does not have a barcode to scan.
To see the item list for a specific box, click the View button next to the box you wish to view.
Restore
Occasionally after submitting a shipment, you may find the need to restore a batch, which will take you back to the Box Contents section and allow you to resubmit your shipping details. An example of when this might be needed is when incorrect box dimensions were submitted, resulting in an incorrect shipping fee. Restoring your batch will allow you to create a new shipment containing all of the inventory from the batch, and the old, incorrect shipment can then be deleted from Seller Central (Inventory > Shipments).To restore a batch, look for the Restore button on a completed batch at the top of the screen.

If you already completed the process of purchasing shipping, be sure to click the Shipping button and Void Shipments to be reimbursed for your incorrect shipping label.
Types of Subscriptions
Go2Lister offers two different subscription plans to meet your budget.
Annual - $479.88 a year ($39.99/month) billed annually.
Monthly - $49.99 a month. You can cancel your monthly subscription at any time
Is Go2Lister an app?
Go2Lister is a web-based platform and can be accessed from any web browser. Go2Lister functions best when used on a desktop or laptop.
Does Go2Lister just work for the US marketplace?
Go2Lister currently only supports the US marketplace. We hope to expand to other marketplaces in the future, but there is currently no timetable for this.
How to do box contents Amazon FBA with Go2lister?
Check out this full tutorial on how to use the Box Content feature to prepare your shipments quickly and accurately via Go2lister.
https://youtu.be/CnMy-lrVNwgIs Go2Lister can only be used in listing books, CDs and DVDs?
No! Go2Lister can be used to list any item that you are approved by Amazon to list. Go2Lister includes all the features you need to list anything in the Amazon catalog, including providing expiration dates and case-packing wholesale products.
Printer
When configuring your printer in Printer Settings, Go2Lister will prompt you to download QZ Tray. This software will connect your thermal printer to Go2Lister and is required for your thermal printer to work properly.
Go2Lister is designed to work with Rollo and Dymo brand thermal printers. All other brand thermal printers are unsupported and may not function properly with Go2Lister.
Rollo Setup
Watch this video on how to set up your Rollo printer with Go2Lister.
https://www.youtube.com/watch?v=AvFh4DtppJgDymo
If your Dymo printer is not detected in Go2Lister's Printer Settings, follow these steps:
Uninstall Dymo Software:
- Uninstall all Dymo software from your computer.Restart Computer:
- Restart your computer after uninstalling the software.
- Open Go2Lister at Go2Lister.com.
- Navigate to Settings: Within Go2Lister, go to Settings (left hand column under Batches) and then click the Printer Settings tab.
- Download Dymo Connect Service Software: Download the appropriate version (PC or Mac) of the Dymo Connect Service Software from the Dymo Software Download Center.
- Run Dymo Connect Service Software: Run the downloaded software. It will appear in your computer's taskbar.
- Diagnose Printer: Click on the software icon in the taskbar and select Diagnose.
- Verify Printer in Go2Lister: After the diagnosing process, open Go2Lister again, navigate to Settings, and then Printer Settings. Your printer and label options should now be visible
Shipments
Can I avoid Split Shipments?
Amazon determines the shipment plan for all sellers based on a variety of factors. The only way to avoid split shipments is to change your FBA Settings in Seller Central to Minimal Shipment Splits. This will most likely result in a single shipment. However, Amazon charges additional fees for this service and using it can significantly delay checking your inventory into the Amazon warehouse.
Go2Lister recommends utilizing the Box Contents feature, which makes split shipments significantly less complicated. However, this is entirely up to individual sellers. You can experiment with the different shipment options (again, by changing your FBA settings in Seller Central) and decide what best fits your business.
Go2Lister recommends utilizing the Box Contents feature, which makes split shipments significantly less complicated. However, this is entirely up to individual sellers. You can experiment with the different shipment options (again, by changing your FBA settings in Seller Central) and decide what best fits your business.
Why are my shipments split even if they are going to the same warehouse?
Shipments that are split but destined for the same warehouse occur when multiple categories (example: books and electronics) are prepared in the same batch. Amazon determines shipment plans and optimizes shipments for maximum efficiency. Adhering to Amazon's split shipments will often result in faster check-in times, in turn making your inventory available for sale faster. If you encounter a split shipment plan that is not acceptable, you can reject the shipment plan and try submitting again, or change your FBA Settings in Seller Central to "Minimal Shipments Splits" which generally will create a single shipment plan (but also result in increased fees).
Transferring Data from Inventory Lab or Accelerlist to Go2lister
You can watch this video to learn how to transfer data from Inventory Lab or Accelerlist to Go2lister
https://youtu.be/nZD7dCMmCc8What does your software offer?
Go2Lister offers a 14-day risk-free trial of the fastest Amazon listing software in the world. The trial gives users access to the full suite of Go2Lister features, including:
- Fastest listing software in the world: List 100+ items per hour. Items can be listed as quickly as you can scan them.
- Smart Pricing: Go2Lister uses an algorithm to suggest prices based on sales velocity and current offers. No more guesswork, no more missed pricing opportunities!
- Integrated Keepa data: Want to take a closer look at the magic behind Smart Pricing? Check out the Keepa data, presented inside the Go2Lister ecosystem, to make informed decisions behind your pricing.
- Instant restriction alerts: If you scan an item and are restricted, Go2Lister will give you instant access to Amazon's approval request page.
- No FBA Alerts: Go2Lister will notify you when an item has no FBA competition. This can be used strategically to gain an advantage over the competition and maximize profits.
- Easily deal with split shipments: Managing split shipments can be difficult, and mistakes can be costly. Go2Lister's Box Contents feature does all the thinking for you, making struggles with split shipments a thing of the past.
- Reports: Get a detailed view of your business in real-time with Go2Lister's suite of reports, including Sales, Orders, Profits, and Inventory. View your reports directly within Go2Lister or export an excel file to customize your data.
Can I print with 30-up labels?
Yes, in the Settings menu, click on the Printer Settings tab. Select Manual (PDF download of individual or 30 up labels) as the Printing Type.
What's the best scanner for scanning items into Go2Lister?
Any barcode scanner that connects via USB or Bluetooth (if available on your device) should work with Go2Lister. For wireless options, our subscribers generally recommend Nadamoo and Eyoyo scanners. For a reliable USB-wired option, we recommend the Wone Nice scanner.
I've noticed that scanned items sometimes don't appear immediately.
How can I fix this?
How can I fix this?
If scanned items aren't showing up in your batch after 10-15 seconds, try refreshing the page in your browser. If this issue persists after refreshing, reach out to Go2Lister's support to troubleshoot the problem or check for updates.
Can I list more than 200 SKUs in a single batch?
Yes, although Amazon limits each batch to 200 SKUs, we have optimized our software to list more than 200 SKUs per batch.
Is there a way to convert a MF batch to FBA, or even part of the items?
No, in this case it would be necessary to create a new FBA batch. Any MF items that are being converted to FBA should be deleted from your Seller Central inventory before submitting in an FBA batch to avoid duplicate listings for a single item.
SKUs can't be found on Seller Central with an error message says
"The SKU for this product is unknown or cannot be found"
"The SKU for this product is unknown or cannot be found"
This error message is most often the result of a delay between Amazon and a third party listing software like Go2Lister. This error message should be resolved on its own within about 15 minutes, though occasionally it can take longer. Please note that finalizing a shipment with this error message displaying could result in your inventory becoming stranded. Fortunately, Go2Lister's Box Contents feature has protections in place to confirm that all inventory is correctly processed before finalizing a shipment.
Keep getting an error that says "State field is missing"
It looks like you did not choose a state in your address input. Please go to batches -> batch history and delete the referred batch. Then go to settings -> address settings, choose your address and remove it by clicking on the trash icon. Then input a new address below and click save. Then create a new batch.
Where to put the FNSKU labels for books?
In order to efficiently check in your inventory, Amazon asks that all original barcodes on books be covered. Place your FNSKU label over the book's barcode, if one is present. If there is no barcode, put it in the same general area (bottom right of back cover). If there are two barcodes, Amazon recommends covering one with an FNSKU label and one with a blank label.
Why the total sales under "total sales" is slightly different than
total sales under "total profit"?
total sales under "total profit"?
Occasionally, these two figures may differ due to time zones and pending sales updates. Your reports will update automatically and you can soon expect these figures to match.
Is there a way to see which warehouse product is shipped to
before sending the batch?
before sending the batch?
Yes! After scanning all of your inventory, you can click Send Batch which will generate your shipping plan. The Destination column will show you what warehouse the shipment will go to. If you, for any reason, do not want your inventory going to a specific warehouse, you can reject the shipment and try again. Bonus tip: if you're curious, you can Google these warehouse codes to find the exact location of the warehouse.
Can I avoid Split Shipments?
Amazon determines the shipment plan for all sellers based on a variety of factors. The only way to avoid split shipments is to change your FBA Settings in Seller Central to Minimal Shipment Splits. This will most likely result in a single shipment. However, Amazon charges additional fees for this service and using it can significantly delay checking your inventory into the Amazon warehouse.
Go2Lister recommends utilizing the Box Contents feature, which makes split shipments significantly less complicated. However, this is entirely up to individual sellers. You can experiment with the different shipment options (again, by changing your FBA settings in Seller Central) and decide what best fits your business.
Go2Lister recommends utilizing the Box Contents feature, which makes split shipments significantly less complicated. However, this is entirely up to individual sellers. You can experiment with the different shipment options (again, by changing your FBA settings in Seller Central) and decide what best fits your business.
Why are my shipments split but going to the same warehouse?
Shipments that are split but destined for the same warehouse occur when multiple categories (example: books and electronics) are prepared in the same batch. Amazon determines shipment plans and optimizes shipments for maximum efficiency in making your products available for sale.. Adhering to Amazon's split shipments will often result in faster check-in times.
If you encounter a split shipment plan that is not acceptable, you can reject the shipment plan and try submitting again, or change your FBA Settings in Seller Central to "Minimal Shipments Splits" which generally will create a single shipment plan (but also result in increased fees).
If you encounter a split shipment plan that is not acceptable, you can reject the shipment plan and try submitting again, or change your FBA Settings in Seller Central to "Minimal Shipments Splits" which generally will create a single shipment plan (but also result in increased fees).
How is the difference between the listing price
and the profit being determined?
and the profit being determined?
The profit of an item is determined by the listing price minus Amazon fees. These fees may include listing fees and fulfillment fees, based on the type of listing (FBA vs. MF). This figure does not include any additional placement fees (shipment fees, labeling fees, etc.)
How does the the min/max price work?
The min/max price options (found in Settings in the Pricing Rules tab) allow sellers to set the minimum and maximum price they are willing to sell an item for. The minimum price setting protects you from selling at a loss, and the maximum price setting can help prevent high pricing errors. These settings are most useful if you're using an automated repricer.
Can I use a phone scanning app or only an actual scanner?
A USB or Bluetooth barcode scanner is needed to scan barcodes in Go2Lister. If you're unsure if your device has Bluetooth, go with the USB option. You can also enter inventory manually by searching by ISBN, UPC, or even the product name, but this is not recommended as it will be a slower process.
Why am I receiving error: NOT_IN_PRODUCT_CATALOG
You could be receiving the NOT_IN_PRODUCT_CATALOG error for one of these reasons:
1. The item is classified as hazmat (flammable, toxic, etc.).
2. The item is restricted from being sold on Amazon and/or you as a seller are restricted from selling it.
3. The item listing is being suppressed by Amazon for not meeting search criteria (such as a poor quality image).
4. The item isn't in the Amazon catalog anymore.
If you are certain there is a live listing on Amazon for the product you are attempting to list, and are approved to list it, try searching by UPC/ISBN/Product Name and attempt to add it to inventory that way.
How can I replenish inventory rather than create a brand new SKU?
To replenish inventory that you have previously submitted, enable the Auto Replenishments slider in the listing tool. This system will automatically use the same SKU to replenish your existing inventory.
Can I still access batches once I cancel my subscription?
Once your subscription to Go2Lister ends, you will no longer have access to any functions. You will not be able to access the batches created in Go2Lister without an active subscription. You can, however, still view/edit your inventory in Amazon Seller Central.
Does Go2lister reprice items?
No. Go2Lister's Smart Pricing feature automatically prices your inventory to maximum profit, but it only sets your initial price. Since pricing on Amazon is so dynamic, a repricing tool is recommended to remain competitive.
Does Go2Lister have a feature that shows the
shipment's estimated weight?
shipment's estimated weight?
Yes! The estimated weight of your boxes will be displayed in the Box Contents section while preparing your shipment. Please note that these are estimated weights based on Amazon's listing information, and are not always accurate. Be sure to check the weight of your boxes before finalizing a shipment to ensure your box does not exceed the permitted weight of 50 pounds per box.
Is the inbound shipping fee included in the FBA fee calculations?
No, because this number is so variable, it is not possible to include the FBA fee calculations in your estimated profits. It will however be included on the Net Profit Report, coming soon!
How to Enroll in the FBA 2D Barcode Program?
Follow the steps to enroll in the FBA 2d barcode program:
1. Log in to your Seller Central account.
2. Go to Settings and at the bottom of the list, select "Fulfilled by Amazon".
3. In the "Inbound Settings" section, choose "Edit" (top right corner).
4. Select "2D Barcodes for Box Content Information" (third option from the top) and click "Enable".
1. Log in to your Seller Central account.
2. Go to Settings and at the bottom of the list, select "Fulfilled by Amazon".
3. In the "Inbound Settings" section, choose "Edit" (top right corner).
4. Select "2D Barcodes for Box Content Information" (third option from the top) and click "Enable".